
Updated: 4/30/2013
-------------------- Battle Mechanics --------------------
Elimination of Items
Consumable items have been completely done away with. This removes one unnecessary aspect of combat I feel. Plus items would break the system from a balance standpoint I think. There's no point to having a healer if everyone can just pull out an item and heal.
Ether Point Management
Ether Points, which is the foundation of the entire system is regenerated each passing turn by 2 points. This is in to help speed up the system and minimize luls in combat. Note that at the start of each battle, your party starts out with 30 EP. You can hold 100 EP Max. But you'll constantly be spending it as battle goes on. You must regulate your EP expenditure in order to fully maximize your battle performance for bonuses at the end of battle. Dead characters do not recover EP.
Elemental Flow Shift
Not so much a unique system as it is an important guideline. All enemy elemental spells will reduce the elemental resistances of the targeted party member by one rank. So the next time they get hit with a spell of the same element, they will take far more damage. This is counteracted by protecting your characters with the right elemental barrier spells. These spells work by restoring LF and boosting an elemental resistance by one rank. So it is a constant struggle between raising and lowering elemental resistances. Slip up and you'll take unnecessary damage.
Strike Chain System
Strike chains are a character's normal attack skill. Hold Z/Enter to continue the skill once it is active. Beware though! Each part of a Strike Chain costs 5 EP for a total of 25 EP max!
If you use a strike chain without the EP needed, then each step of the chain will drain 10% LF from the character! Strike Chains also have varying innate elements depending on the character. Gunnar's is Light, Veili's is Crystal, Priel's is Flame, and Patchoulli's is Air. The use of strike chains is vital in order to take advantage of combo chain damage count while building up Burst to unleash later on.
If you use a strike chain without the EP needed, then each step of the chain will drain 10% LF from the character! Strike Chains also have varying innate elements depending on the character. Gunnar's is Light, Veili's is Crystal, Priel's is Flame, and Patchoulli's is Air. The use of strike chains is vital in order to take advantage of combo chain damage count while building up Burst to unleash later on.
Burst Skill System
Burst Skills are powerful skills that each character has access to once they gain 3 Burst Points, or BP for short.
BP can be located at the bottom of a character's battle HUD. The three slots below the face. BP can be gained by either Strike Chains or Ether spells. When you gain the necessary BP, the Burst Command appears and the skills that character can use are shown.
Burst Skills have elemental properties and differ in effects and amount of hits, so choose the skills you feel are right for the situation at hand!
Also to be noted are that both Burst Skills and Ether Skills have base damage modifiers in addition to elemental properties and any other passive and active effects they may employ. Choose the right skills to use for the right situations!

Link Arts are combination skills that extend off of Burst Skills. They contain elements and properties that the character may not have access to otherwise as well as have effects from both command skills involved in the link if applicable. Link Arts are the very last skills to be used in order.
After a burst/ether skill, if a Link Art can be used, a message 'Chain Chance!' will appear for about a second. Hold Decision during this time to activate the available Link Art. Multiple Link Arts can be activated if the correct combination of Command Skills are active, but the command skills needed are different for each Link Art, so you also need to take heed of your entire party combination if you want to use more than one in a chain.
Link arts require a command skill from both characters to be active. Once a Link Art is used, the command skills involved in their activation will be ended. What makes Link Arts effective is the fact that the stats of both characters involved in the Link Art with be combined before the effect occurs. All passive effects involved in the calculation will be bolstered by the combined stats of both characters.
EX Blocks are the blue cubes located on the right of a character's Battle HUD, you can expend these for Crisis Recover, Exceed Limits, and Sacred Wills. They also are used with some passive skills.
You slowly gain EX from taking action in battle. However, you gain the most EX from using burst skills. Using a burst skill gives you a whole block, while it would take 5 normal actions to get one otherwise. However it all adds up.
Hold Z/Enter during a Burst or Ether Skill in order to extend it into a character's EX Limit. An EX Limit is essentially an extra action taken outside of your turn. Both Bursts and Spells have EX Limits attached to them.
EX Limits for Burst Skills take 2 EX Blocks. EX Limits for Spells take 1 EX Block. However in order to unlock EX Limits, you need to upgrade your character's Special Rank in the Advance Menu.
Sacred Will are character's ultimate special moves. Once you have 5 blocks, you can hold decision during that character's final Burst Skill to use their SW. However, SW is not available from the start. You must unlock them through different means. What are those means?
Who knows...
Whenever you land hits on the enemy, a combo counter will appear and begin to increase with each hit dealt. As the combo increases, your combo count will be added to your damage. Your combo count carries over to your other party members as well, so when your characters act, back to back, you can deal big damage through the shared combo count.
Combo Chain ends when an enemy acts however. No matter what, if an enemy acts, then the Chain will be cut off and you will have to start over.
The damage counter is another bonus of the system. For every 100 points of damage you deal, you gain 1 point of SP. So the higher damage you deal, the more bonus SP you can gain. It also tells you how much damage your attacks are doing. Seeing multiple hits flash by makes it hard to tell how effective skills are otherwise. Win win, no?
By holding X during a Strike Chain, Burst, or Spell, you can expend 1 EX Block to boost a character's LF and EP a bit. If you feel that healing action or Focus command is going to be too late, then you can hold cancel to heal that character and probably save their life.
Performing EX Recoveries is vital to survival in the battle system, as well as keeping a character's EP up. But use EX Recovery too much and you will not have enough EX to use for EX Limits and Support Turn Changes. So balance it out!
Since there are no items and very little proper healing spells in SEM. Bringing a character back to life when they are killed would be challenging. Therefore. I devised the Life Point System. This system exists to bring your character back to life when they run out of LF. It takes 6 turns after a character is killed for them to revive. They come back with a portion of LF and EP.
Life Points can be viewed at the bottom of each character's battle HUD. Each character only has three Life Points. When they run out, then they lose the support of the system. However, you can use alternate revival methods to bring dead characters back even after their LP is gone. That is, if you have such methods...
Burst Skills are powerful skills that each character has access to once they gain 3 Burst Points, or BP for short.
BP can be located at the bottom of a character's battle HUD. The three slots below the face. BP can be gained by either Strike Chains or Ether spells. When you gain the necessary BP, the Burst Command appears and the skills that character can use are shown.
Burst Skills have elemental properties and differ in effects and amount of hits, so choose the skills you feel are right for the situation at hand!
Also to be noted are that both Burst Skills and Ether Skills have base damage modifiers in addition to elemental properties and any other passive and active effects they may employ. Choose the right skills to use for the right situations!
Link Arts Chain System
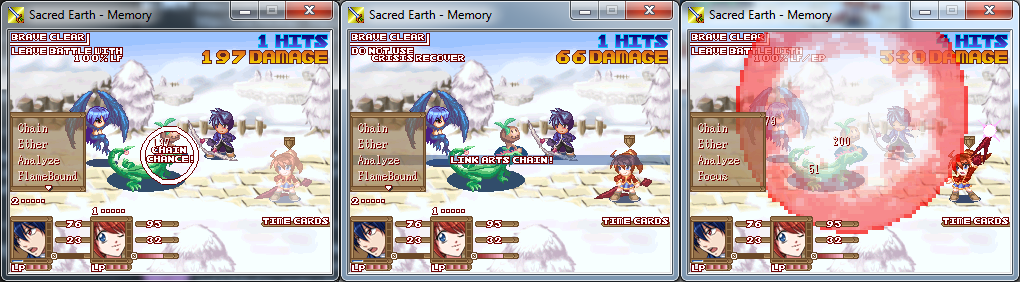
Link Arts are combination skills that extend off of Burst Skills. They contain elements and properties that the character may not have access to otherwise as well as have effects from both command skills involved in the link if applicable. Link Arts are the very last skills to be used in order.
After a burst/ether skill, if a Link Art can be used, a message 'Chain Chance!' will appear for about a second. Hold Decision during this time to activate the available Link Art. Multiple Link Arts can be activated if the correct combination of Command Skills are active, but the command skills needed are different for each Link Art, so you also need to take heed of your entire party combination if you want to use more than one in a chain.
Link arts require a command skill from both characters to be active. Once a Link Art is used, the command skills involved in their activation will be ended. What makes Link Arts effective is the fact that the stats of both characters involved in the Link Art with be combined before the effect occurs. All passive effects involved in the calculation will be bolstered by the combined stats of both characters.
EX Blocks, Exceed Limits, Sacred Will System
EX Blocks are the blue cubes located on the right of a character's Battle HUD, you can expend these for Crisis Recover, Exceed Limits, and Sacred Wills. They also are used with some passive skills.
You slowly gain EX from taking action in battle. However, you gain the most EX from using burst skills. Using a burst skill gives you a whole block, while it would take 5 normal actions to get one otherwise. However it all adds up.
Hold Z/Enter during a Burst or Ether Skill in order to extend it into a character's EX Limit. An EX Limit is essentially an extra action taken outside of your turn. Both Bursts and Spells have EX Limits attached to them.
EX Limits for Burst Skills take 2 EX Blocks. EX Limits for Spells take 1 EX Block. However in order to unlock EX Limits, you need to upgrade your character's Special Rank in the Advance Menu.
Sacred Will are character's ultimate special moves. Once you have 5 blocks, you can hold decision during that character's final Burst Skill to use their SW. However, SW is not available from the start. You must unlock them through different means. What are those means?
Who knows...
Combo Chain System
Whenever you land hits on the enemy, a combo counter will appear and begin to increase with each hit dealt. As the combo increases, your combo count will be added to your damage. Your combo count carries over to your other party members as well, so when your characters act, back to back, you can deal big damage through the shared combo count.
Combo Chain ends when an enemy acts however. No matter what, if an enemy acts, then the Chain will be cut off and you will have to start over.
The damage counter is another bonus of the system. For every 100 points of damage you deal, you gain 1 point of SP. So the higher damage you deal, the more bonus SP you can gain. It also tells you how much damage your attacks are doing. Seeing multiple hits flash by makes it hard to tell how effective skills are otherwise. Win win, no?
Exceed Recovery
By holding X during a Strike Chain, Burst, or Spell, you can expend 1 EX Block to boost a character's LF and EP a bit. If you feel that healing action or Focus command is going to be too late, then you can hold cancel to heal that character and probably save their life.
Performing EX Recoveries is vital to survival in the battle system, as well as keeping a character's EP up. But use EX Recovery too much and you will not have enough EX to use for EX Limits and Support Turn Changes. So balance it out!
Life Point System
Since there are no items and very little proper healing spells in SEM. Bringing a character back to life when they are killed would be challenging. Therefore. I devised the Life Point System. This system exists to bring your character back to life when they run out of LF. It takes 6 turns after a character is killed for them to revive. They come back with a portion of LF and EP.
Life Points can be viewed at the bottom of each character's battle HUD. Each character only has three Life Points. When they run out, then they lose the support of the system. However, you can use alternate revival methods to bring dead characters back even after their LP is gone. That is, if you have such methods...
Barrier LF System

The entire city is displayed on a single panorama which is then littered with icons of different types. You move Gunnar's icon about and interact with these to talk to relevant characters, accept quests, visit the library and arena, and continue story events.
!: Event/ Continue Events
Smileface: Quest
I.D.E: View I.D.E Reports
Book: Visit Library
Sword: Visit Arena
Character Head: Talk to that character. Characters in town differ from day to day and between events as well, so you may want to check town whenever you're free after events. It may be beneficial to talk to whoever you can.

The main menu displays all the characters in your party, who's in the battle party and who is reserve, their current ranks, the RP needed to get to the next rank, annnd their soul alignments. Off to the side the menu displays current SP held as well as the options, Status, Advance, Crossover, and To Title.
-Menu Options-
STATUS: Select this option in order to view the stats for each character.
ADVANCE: Select this option in order to access the menu where you will spend your SP for skills.
LOAD GAME: Select this option to access the loading screen for your convenience.
TO TITLE: Select this option to return to the title screen.
- Term Breakdown -
RANK: Your character's current overall skill rank. The higher it is, the stronger your character gets. Rank can be anywhere from 1 to 999. So you have 999 Ranks in order to influence each character's stats in the way you want to.
ACT/WAIT: Indicates whether or not a character is in the battle party. A full battle party consists of three characters max. However you need only one character active in order to fight. Active characters gain full RP after battles. Waiting characters get half RP. So in this way, everyone will rank up even if you don't use them. Just, active characters will grow faster than non active characters.
NEXT: Shows how much RP is needed in order to reach the next Rank. Each and every Rank Up requires 1000 RP. No more, no less. Excess RP from Rank Ups will carry over to the next requirement, so there's never any wasted RP.
LIFE/PWR/PRY/KNW: Shows which stat will be focused on upon Rank Up. A character focusing on Life will gain more LF upon Rank Up than a character who isn't. In this way, you can gradually shape your characters the way you want to.
OBJECTIVE: Shows the current Quest Objective. There can only be one quest objective at a time, so you must finish it before taking another.
From this menu, you can view your character's statistics and elemental ratings. This is the only menu where you can check your stats, so make sure to look here before you decide how to align your character's stats for Rank Ups.
-Individual Stats-
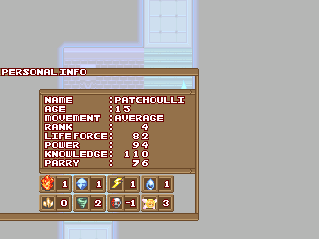
Movement(QCK): This rating determines your character's Turn Speed in battle. Movement cannot be changed normally. Only through a passive skill that select few characters have, can it be raised slightly. Otherwise, movement is static. Movement has three classes; Slow, Average, and Fast. Fast characters always get their turns first. Average characters come in next, and then Slow characters follow last.
Rank(RANK): This value is merely an indicator of your character's overall level of ability. The higher it is, the higher your stats will be. When Rank increases all stats increase with it. So raise your rank to get stronger. But make sure you're watching your character's alignments or your stats may go out of whack.
Life(LIFE): This value determines how much damage your character can take in battle. If your damage exceeds your life, you will unable to fight for a short period of time. After which, that character will return to battle with a percentage of life. You can acquire a passive skill in order to shorten the wake time between revives. But beware that each character is only allowed three revives, or 'LP' per battle. LP can be seen at the bottom of the battle HUD.
Power(PWR): This value determines how much damage your physical skills deal. The higher your power, the more damage you will do. As a general reference, the first one or two digits from the left are your base damage. So looking above, Patchoulli's base Physical Damage is 8. This is a rough reference as damage modifiers, elements, and bonus damage all add up to it as well. But at it's lowest, 8 is the amount of damage Patch can deal.
Knowledge(KNW): This value determines how much damage your magic spells and KNW based skills deal. The higher it is, the more damage you deal. As a general reference, the first one or two digits from the left are your base damage. So looking above, Patchoulli's base Magical Damage is 11. This is a rough reference as damage modifiers, elements, and bonus damage all add up to it as well. But at it's lowest, 11 is the amount of damage Patch can deal.
Parry(PRY): This is a joint value that determines how much damage is reduced from both Physical and Magic based attacks. The higher it is, the less damage you take.
-Elemental Ratings-

This is the menu where you spend the SP you earn from quests and battles. Each character has three different skill categories to spend SP on with five skills in two of them and ten in the other. Each rank maxes out at rank five. Your characters start out with no skills but their custom commands, so you must build them all up from scratch. Don't worry, commands like Burst and Ether won't appear in battle if you have no skills in that category, so everything still moves along fine.
Burst Rank: Spend SP here in order to gain new Burst Skills for your character. Burst skills can be used once a character fills their Burst Meter, which takes three Chains/Spells. Burst skills are more powerful than Chains and they give out more EX, so it's advised to have at least one on hand.
Ether Rank: Spend SP here in order to gain new Ether Spells for your character to use. You start out with no Ether Spells and you must buy them all starting with your first. Each character has two elemental categories. You must choose which element to buy from at that moment. So in this way, you can never get all ten spells that a character has. You must create your own spell list of five by picking and choosing between elements each rank.
Special Rank: Spend SP here in order to gain passive stat boosts, unlock EX Limits and Sacred Will, and cut revive time by half. Special Rank is the most costly Rank, so it takes time to get everything from it.

When you travel about dungeons and field areas, you may find material called 'Soul Essence' laying about. Some of it is hidden, some of it is in plain sight. It is up to the player to find them. You spend your collected Soul Essence on this menu here to gain stat bonuses to help your characters alongside Rank ups. Think of it as a reward for going out of your way to find them. Each character has a max Soul Rank of 20. The cost of increasing a character's Soul Rank is the number of the next rank. So advancing to Rank 13 will cost 13 Soul Essence. That is about all there is to the menu.
An enemy only system. Enemies have a second life value called Barrier. As long as enemies still have Barrier, then all your attacks will do half damage. The goal is to reduce enemy Barrier to zero in order to deal full damage. Different enemies have differing amounts of Barrier, however they all receive the same damage. 1 hit from an attack = 1 point of damage to Barrier. So a 5 hit attack will reduce Barrier by 5 points. Barrier can be checked with the Analyze Command that all characters have.
All characters have the Focus command. Using this command restores that character's LF by 1/10 and restores 10 EP on top of the EP gained back by passing turns. Focus also greatly reduces damage from everything including enemy SWs. If you're really low on EP, then it might be a good idea to focus for a couple turns. You'll be back up to speed in no time.
Focus Guard System
All characters have the Focus command. Using this command restores that character's LF by 1/10 and restores 10 EP on top of the EP gained back by passing turns. Focus also greatly reduces damage from everything including enemy SWs. If you're really low on EP, then it might be a good idea to focus for a couple turns. You'll be back up to speed in no time.
Custom Character Commands
All characters have 2 custom command skills that they can activate free of charge in order to produce passive effect alterations in their Strike Chains, Bursts, and Spells. It is essential to make use of these at the right times in order to make fighting easier.
When a command skill is used, a meter with 5 blocks will appear above the character's HUD, These are your command skill charges, whenever you take an action that the command skill affects, it will go down a charge. So this way you know exactly when it will go.
- Gunnar -
1. Soul Eater - Gains back LF equal to half the damage each hit of a Strike Chain, Spell, or Burst does.
2. High Spell - When casting Offensive Ether Spells, half of Gunnar's KNW is added to the damage.
-Veili -
1. Soul Burst - Critical Hit chance is set to 1/3 for Strike Chains, Spells and Bursts allowing for a much higher chance to strike Critical Blows than normal.
2. Ether Burst - Retain 2 EP from each part of a strike chain for a max of 10 EP saved.
- Priel -
1. Flamebound - Strike Chains and Burst Skills gain extended movements and hits. Essentially, Flamebound is a limiter release for all of her attacks and skills. So Priel's maximum effectiveness lasts only as long as Flamebound is active.
2. Heroic Spirit - All damage is multiplied by 2, but critical hits are negated.
- Patchoulli -
1. Light of Will - Restores the party's LF with each hit of an attack Patch makes. Recovery is based on KNW/20
2. Aether Gate - Strike Chains cost no EP.
Flame < - > Crystal
Bolt < - > Aqua
Air < - > Gaea
Shadow < - > Light -
Guardian < - > Ravager
Status effects are very minor in SEM, but there are a couple to watch out for. Status effects are grouped into 2 categories, RED and BLUE. This is called such because your character will glow red or blue depending on the status they have. This is merely an indicator as to which recovery spell you should use on them.
Toxins: Lose 5% HP for 5 turns.
Freeze: Target is paralyzed for 10 turns and PRY is halved.
Burn: Target loses 5% HP for 5 turns and Burst Skills cannot be used.
Burst Seal: Burst Skills cannot be used for 5 turns.
Ether Seal: Ether Skills cannot be used for 5 turns.
ATB Delay: Target is paralyzed for 2 turns.
MOV Crush: Target is paralyzed for 5 turns.
PWR Crush: PWR is halved for 5 turns
PRY Crush: PRY is halved for 5 turns.
KNW Crush: KNW is halved for 5 turns.
Physical Damage: User's Power * (Skill modifier of 1-15 depending on skill) / 10 - (Target Parry / 20) + Rand(5) * Elemental Modifiers and then add Critical Check.*
Magic Damage: User's Knowledge * (Skill modifier of 1-15 depending on skill) / 10 - (Target Parry / 20) + Rand(5) * Elemental Modifiers and then add Critical Check.*
Critical Chance: Depending on the skill in use, there will be a different critical check used. There are four types. 1/2, 1/3, 1/5, and 1/10 chances of striking a critical. The less hits a skill has, the higher it's critical chance. The more hits, the less chance there it to crit.
*: There is no missing in SEM. I find it to be a tired and very irritating RPG Mechanic. As such, I never want to see the word 'Miss' in my game ever. Therefore, every skill in the game is a guaranteed hit. The strategy is not in dodging, but in preparing for and mitigating damage while dealing out your own.
When a command skill is used, a meter with 5 blocks will appear above the character's HUD, These are your command skill charges, whenever you take an action that the command skill affects, it will go down a charge. So this way you know exactly when it will go.
- Gunnar -
1. Soul Eater - Gains back LF equal to half the damage each hit of a Strike Chain, Spell, or Burst does.
2. High Spell - When casting Offensive Ether Spells, half of Gunnar's KNW is added to the damage.
-Veili -
1. Soul Burst - Critical Hit chance is set to 1/3 for Strike Chains, Spells and Bursts allowing for a much higher chance to strike Critical Blows than normal.
2. Ether Burst - Retain 2 EP from each part of a strike chain for a max of 10 EP saved.
- Priel -
1. Flamebound - Strike Chains and Burst Skills gain extended movements and hits. Essentially, Flamebound is a limiter release for all of her attacks and skills. So Priel's maximum effectiveness lasts only as long as Flamebound is active.
2. Heroic Spirit - All damage is multiplied by 2, but critical hits are negated.
- Patchoulli -
1. Light of Will - Restores the party's LF with each hit of an attack Patch makes. Recovery is based on KNW/20
2. Aether Gate - Strike Chains cost no EP.
Elements
The elements of SEM work in such a way that they are paired against another element. Both elements can beat each other, yet at the same time, both are also weak to each other. It is a double edged sword in that regard. For example, Priel can do massive damage to Crystal based enemies with Flame based abilities, but those same enemies can nearly one shot her due to elemental weakness to Crystal. It is imperative to capitalize on weaknesses and cover your vulnerable party members at the same time.Flame < - > Crystal
Bolt < - > Aqua
Air < - > Gaea
Shadow < - > Light -
Guardian < - > Ravager
Status Effects
Status effects are very minor in SEM, but there are a couple to watch out for. Status effects are grouped into 2 categories, RED and BLUE. This is called such because your character will glow red or blue depending on the status they have. This is merely an indicator as to which recovery spell you should use on them.
Toxins: Lose 5% HP for 5 turns.
Freeze: Target is paralyzed for 10 turns and PRY is halved.
Burn: Target loses 5% HP for 5 turns and Burst Skills cannot be used.
Burst Seal: Burst Skills cannot be used for 5 turns.
Ether Seal: Ether Skills cannot be used for 5 turns.
ATB Delay: Target is paralyzed for 2 turns.
MOV Crush: Target is paralyzed for 5 turns.
PWR Crush: PWR is halved for 5 turns
PRY Crush: PRY is halved for 5 turns.
KNW Crush: KNW is halved for 5 turns.
-------------------- Battle Algorithms --------------------
Physical Damage: User's Power * (Skill modifier of 1-15 depending on skill) / 10 - (Target Parry / 20) + Rand(5) * Elemental Modifiers and then add Critical Check.*
Magic Damage: User's Knowledge * (Skill modifier of 1-15 depending on skill) / 10 - (Target Parry / 20) + Rand(5) * Elemental Modifiers and then add Critical Check.*
Critical Chance: Depending on the skill in use, there will be a different critical check used. There are four types. 1/2, 1/3, 1/5, and 1/10 chances of striking a critical. The less hits a skill has, the higher it's critical chance. The more hits, the less chance there it to crit.
*: There is no missing in SEM. I find it to be a tired and very irritating RPG Mechanic. As such, I never want to see the word 'Miss' in my game ever. Therefore, every skill in the game is a guaranteed hit. The strategy is not in dodging, but in preparing for and mitigating damage while dealing out your own.
-------------------- Field and Menu Mechanics --------------------
Town Navigation

The entire city is displayed on a single panorama which is then littered with icons of different types. You move Gunnar's icon about and interact with these to talk to relevant characters, accept quests, visit the library and arena, and continue story events.
!: Event/ Continue Events
Smileface: Quest
I.D.E: View I.D.E Reports
Book: Visit Library
Sword: Visit Arena
Character Head: Talk to that character. Characters in town differ from day to day and between events as well, so you may want to check town whenever you're free after events. It may be beneficial to talk to whoever you can.
Main Menu

The main menu displays all the characters in your party, who's in the battle party and who is reserve, their current ranks, the RP needed to get to the next rank, annnd their soul alignments. Off to the side the menu displays current SP held as well as the options, Status, Advance, Crossover, and To Title.
-Menu Options-
STATUS: Select this option in order to view the stats for each character.
ADVANCE: Select this option in order to access the menu where you will spend your SP for skills.
LOAD GAME: Select this option to access the loading screen for your convenience.
TO TITLE: Select this option to return to the title screen.
- Term Breakdown -
RANK: Your character's current overall skill rank. The higher it is, the stronger your character gets. Rank can be anywhere from 1 to 999. So you have 999 Ranks in order to influence each character's stats in the way you want to.
ACT/WAIT: Indicates whether or not a character is in the battle party. A full battle party consists of three characters max. However you need only one character active in order to fight. Active characters gain full RP after battles. Waiting characters get half RP. So in this way, everyone will rank up even if you don't use them. Just, active characters will grow faster than non active characters.
NEXT: Shows how much RP is needed in order to reach the next Rank. Each and every Rank Up requires 1000 RP. No more, no less. Excess RP from Rank Ups will carry over to the next requirement, so there's never any wasted RP.
LIFE/PWR/PRY/KNW: Shows which stat will be focused on upon Rank Up. A character focusing on Life will gain more LF upon Rank Up than a character who isn't. In this way, you can gradually shape your characters the way you want to.
OBJECTIVE: Shows the current Quest Objective. There can only be one quest objective at a time, so you must finish it before taking another.
Status Menu

From this menu, you can view your character's statistics and elemental ratings. This is the only menu where you can check your stats, so make sure to look here before you decide how to align your character's stats for Rank Ups.
-Individual Stats-
Movement(QCK): This rating determines your character's Turn Speed in battle. Movement cannot be changed normally. Only through a passive skill that select few characters have, can it be raised slightly. Otherwise, movement is static. Movement has three classes; Slow, Average, and Fast. Fast characters always get their turns first. Average characters come in next, and then Slow characters follow last.
Rank(RANK): This value is merely an indicator of your character's overall level of ability. The higher it is, the higher your stats will be. When Rank increases all stats increase with it. So raise your rank to get stronger. But make sure you're watching your character's alignments or your stats may go out of whack.
Life(LIFE): This value determines how much damage your character can take in battle. If your damage exceeds your life, you will unable to fight for a short period of time. After which, that character will return to battle with a percentage of life. You can acquire a passive skill in order to shorten the wake time between revives. But beware that each character is only allowed three revives, or 'LP' per battle. LP can be seen at the bottom of the battle HUD.
Power(PWR): This value determines how much damage your physical skills deal. The higher your power, the more damage you will do. As a general reference, the first one or two digits from the left are your base damage. So looking above, Patchoulli's base Physical Damage is 8. This is a rough reference as damage modifiers, elements, and bonus damage all add up to it as well. But at it's lowest, 8 is the amount of damage Patch can deal.
Knowledge(KNW): This value determines how much damage your magic spells and KNW based skills deal. The higher it is, the more damage you deal. As a general reference, the first one or two digits from the left are your base damage. So looking above, Patchoulli's base Magical Damage is 11. This is a rough reference as damage modifiers, elements, and bonus damage all add up to it as well. But at it's lowest, 11 is the amount of damage Patch can deal.
Parry(PRY): This is a joint value that determines how much damage is reduced from both Physical and Magic based attacks. The higher it is, the less damage you take.
-Elemental Ratings-
Each Character/Enemy has an elemental resistance that ranges from -1 to 3 on each element. Depending on this number, an elemental attack will do more or less damage.
If it's -1, then damage is tripled.
If it's 0, then damage is doubled.
If it's 1, then it does normal damage.
If it's 2, then damage is divided by two.
If it's 3 then damage is divided by three.
So it's important to check resistances and use the right skills and spells so that you don't waste EP doing little damage.
Soul Evolution System

Burst Rank: Spend SP here in order to gain new Burst Skills for your character. Burst skills can be used once a character fills their Burst Meter, which takes three Chains/Spells. Burst skills are more powerful than Chains and they give out more EX, so it's advised to have at least one on hand.
Ether Rank: Spend SP here in order to gain new Ether Spells for your character to use. You start out with no Ether Spells and you must buy them all starting with your first. Each character has two elemental categories. You must choose which element to buy from at that moment. So in this way, you can never get all ten spells that a character has. You must create your own spell list of five by picking and choosing between elements each rank.
Special Rank: Spend SP here in order to gain passive stat boosts, unlock EX Limits and Sacred Will, and cut revive time by half. Special Rank is the most costly Rank, so it takes time to get everything from it.
Soul Shaping System
